Biomni Web on Chimera
Access: JupyterHUB
Biomni Web is an agent for biomedical research. You give it a research task in natural language, and it plans the work, writes and runs code, and returns results and generated files. It has its own catalogue of biomedical tools, datasets, software, and skills that it retrieves from as needed.
On Chimera, Biomni Web runs as a proxied web application inside your JupyterHUB session. The application itself runs in an Apptainer container from a shared deployment under /work/_software/biomni, so you do not install Biomni itself. You only install a small launcher package that adds the tile to your JupyterLab launcher.
For a comparison with the other platforms, see Agentic platforms for research.
Prerequisites
- A Chimera account with access to JupyterHUB.
- A writable
/work/$USERdirectory. Biomni Web keeps its sessions, credentials, caches, and user data there. If/work/<CASlogin>is missing or not writable, ask the Chimera administrators to create it for your account. - Your own API key for Anthropic or OpenAI. Chimera does not provide a shared key.
Install the launcher
Biomni Web is not installed for you. Install the launcher package once, into your own Python user site.
First, list the shared deployment directory and pick the newest launcher wheel:
ls /work/_software/biomni/biomni-uk/deploy/jupyter_biomni_proxy/dist/
At the time of writing, the newest wheel is jupyter_biomni_proxy-0.1.0-py3-none-any.whl. Install it directly:
/usr/bin/python3 -m pip uninstall -y jupyter-biomni-proxy
/usr/bin/python3 -m pip install --user --no-deps --force-reinstall \
  /work/_software/biomni/biomni-uk/deploy/jupyter_biomni_proxy/dist/jupyter_biomni_proxy-0.1.0-py3-none-any.whl
If a newer wheel has appeared in that directory since, use its filename instead.
Use the prebuilt wheel shown above. Do not install this package with pip install -e.
Check the installed version with:
/usr/bin/python3 -c 'import importlib.metadata as m; print(m.version("jupyter-biomni-proxy"))'
Start Biomni Web
- Restart your JupyterHub server, so that JupyterLab discovers the new launcher entry. Reloading the browser page is not enough.
- Open JupyterLab again.
- In the launcher, click the Biomni Web tile.
The first start is slow, because the container and the application environment have to come up. The launcher waits up to 900 seconds before giving up, so a blank or loading page for a while is expected rather than a sign that something has failed.
Choose a model and enter your API key
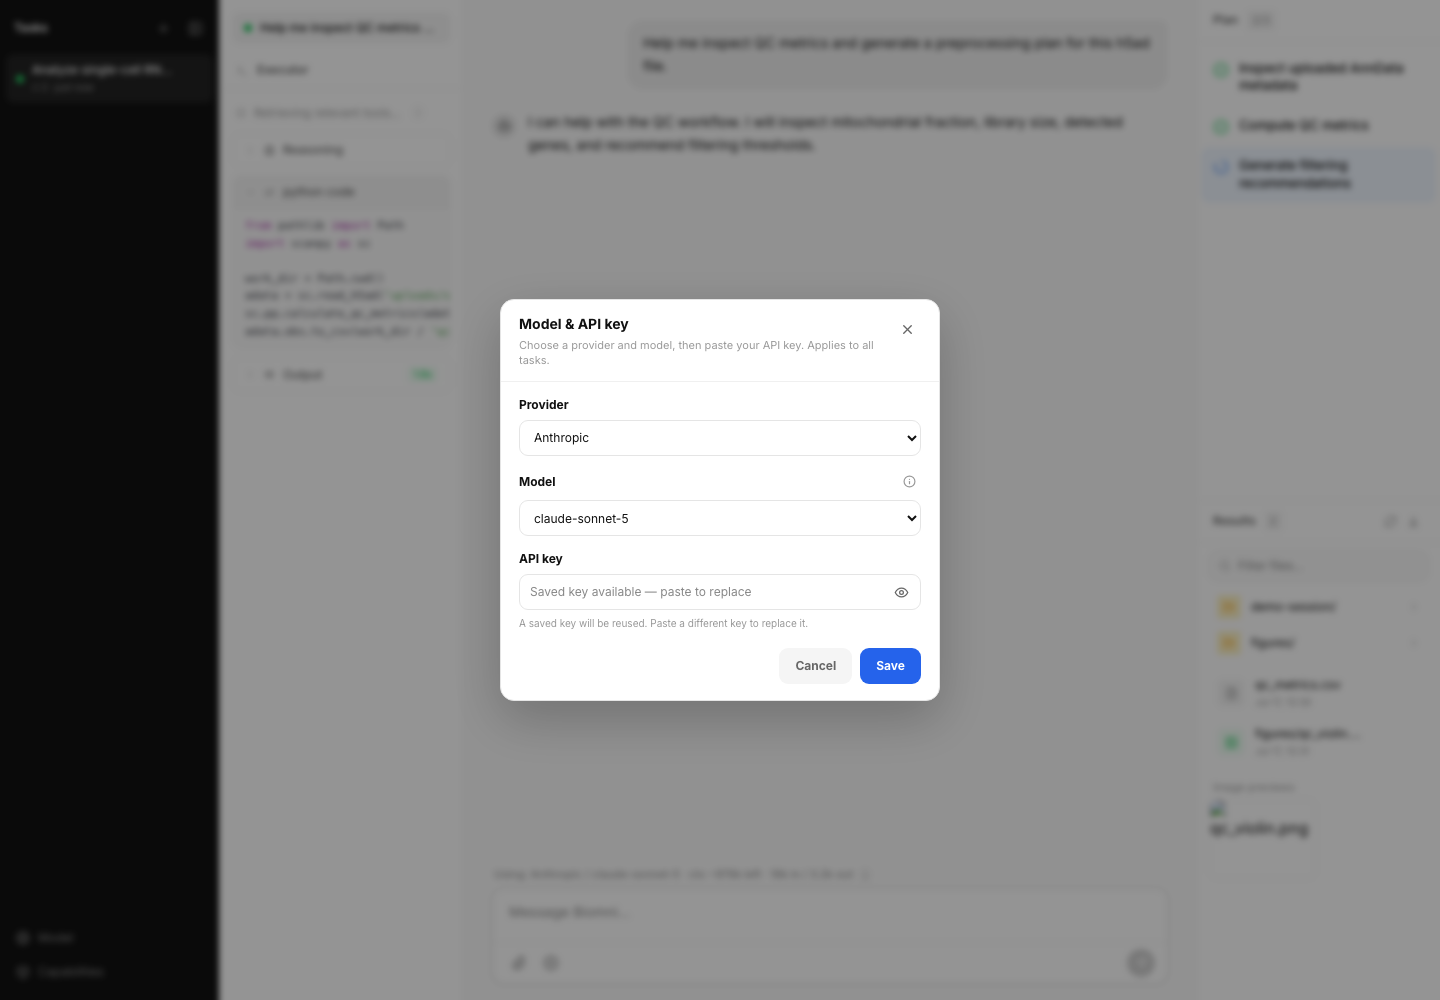
Biomni will not run a task until a model has been saved and activated. Open the model selector from the Model button in the lower-left sidebar and set:
- Provider: Anthropic or OpenAI.
- Model: one of the listed models, or Custom... to type a provider-specific model name.
- API key: your key for the selected provider.
Click Save to activate the model. Saved keys are reused, so the field will tell you when a stored key is available; paste a new one only to replace it.
Biomni Web cannot currently use the university's LiteLLM gateway, so a LiteLLM key will not work here. Support for the gateway is expected in a future update; for now you need a key from Anthropic or OpenAI directly.
The status line above the composer then shows the active model together with remaining context and token usage for the session, for example:
Using: Anthropic / claude-sonnet-5 · ctx ~978k left · 18k in / 3.2k out
WARNING: Biomni sends your task, your uploaded files, and intermediate results to the model provider you configure. Do not give it secrets, passwords, tokens, private keys, or data you are not allowed to share with that provider. Any action the agent takes remains your personal responsibility.
Data locations
Biomni Web stores your state under /work, never in /home:
/work/<username>/.biomni        runtime state, sessions, credentials, caches
/work/<username>/BIOMNI_DATA    your user data
Two further locations are shared and read-only from your point of view:
/work/_software/biomni          shared Biomni software deployment
/work/_datasets/biomni          shared datasets
Do not store your own data in the shared software directory. Your data belongs under /work/<username>.
Using the interface
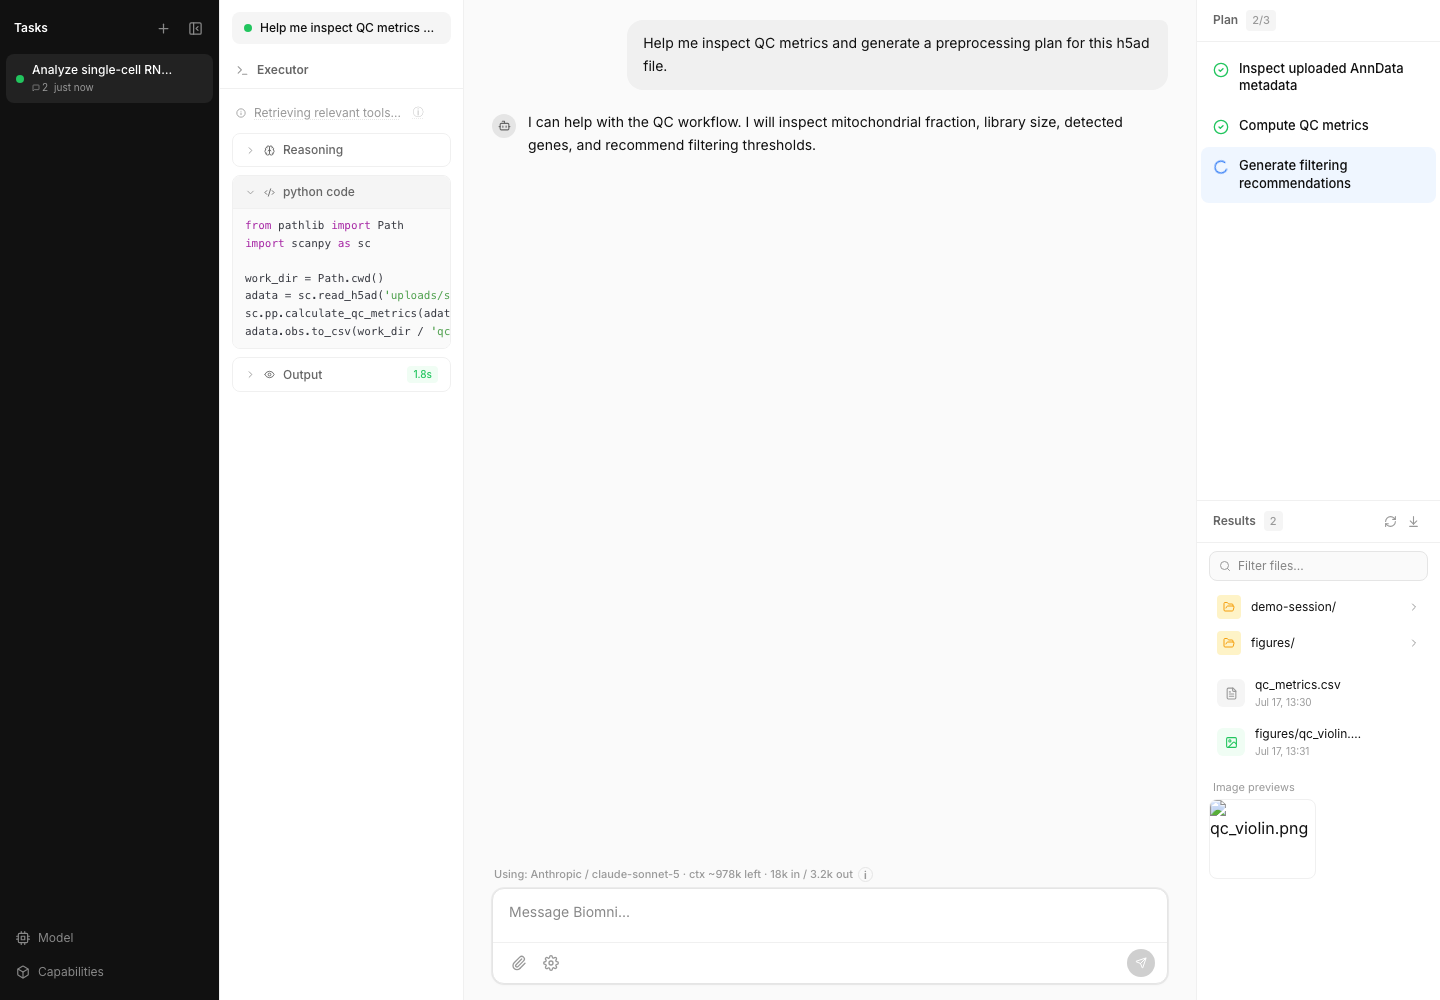
Biomni Web is organized around one research task at a time. The Tasks sidebar on the left creates and switches between task sessions; each task has its own workspace, uploaded files, log, plan, results, and usage counters. Start a new task when you change project, dataset, or question, and stay in the same task when a follow-up depends on earlier messages or generated files.
You type requests in the composer at the bottom, attach local files with the paperclip button, and watch the agent work in the Executor panel, which shows its reasoning, code execution, observations, and retrieval steps. The Plan panel tracks the current multi-step plan, and the Results panel lets you preview and download the files the task produced.
The Capabilities drawer is worth knowing about. It lists the tools, datasets, software, and skills the agent can retrieve into its context, and lets you switch individual items off. Disabled resources are skipped by the retriever and stop consuming context tokens, which is useful for keeping the agent focused on one domain. When retrieval picks the wrong resources for a task, adjust the enabled items there and run the task again.
The full interface reference, including model settings, presets, cost counters, and retrieval inspection, is maintained in the Biomni Web documentation.
Troubleshooting
The Biomni Web tile does not appear in the launcher. Restart your JupyterHub server; a browser reload does not pick up a new launcher entry. If the tile is still missing, check that the wheel was installed into the same Python environment that runs jupyterhub-singleuser, and that the version reported by the check command above is the one you expect.
The application does not start, or reports that it cannot write its data. Confirm that /work/$USER exists and is writable. Ask the administrators to create /work/<CASlogin> if it does not exist.
The first load takes a very long time. This is expected; see above.
The session keeps running after you close the browser. It does. Closing the tab or using Log Out does not stop your JupyterHub session, and it continues to hold cluster resources. End the session from the JupyterHub control panel, as described in JupyterHUB.