JupyterHUB
JupyterHUB provides web-based access to the cluster without requiring local software installation.
- Login: Access the faculty JupyterHUB and click "Sign in with Charles University" using CAS credentials.
- Resource Selection:
- Partition: Use
edufor teaching/testing (3-hour limit); use departmental partitions for research. - Memory/CPU: Default is 2 GB RAM and 2 CPUs (1 core).
- Other Options: Use
-A <account_name>in "Other SLURM options" if accessing a project partition.
- Partition: Use
- Usage:
- Kernels: Supports Python3, Gnuplot, Mathematica, and Bash.
- Files: Supports drag-and-drop for uploads. For downloads, right-click and select "Copy Download link".
- Closing Session: You must end the session in the JupyterHUB control panel. Simply logging out keeps the remote session running until the wall-time expires.
Detailed instructions
JupyterHUB is a web interface which provides access to various applications running remotely on the faculty HPC cluster. HPC cluster is a set of computing servers interconnected by a high speed network and equipped with a central data storage. You can think of the cluster as a tool which you can use freely through your studies, provided you obey the Code of conduct. Accessing the cluster via JupyterHUB is the most straightforward way because it does not require installation of any software on your side.
Alternatively, you can access the cluster directly from the command line by following the instructions from the home page. Typically, you will want to do it from a computer running a Linux operating system (or a Linux subsystem for Windows). This requires a non-trivial setup which you'll have to go through yourself.
A full documentation for the HPC cluster, including a basic introduction to SLURM, is available through the faculty GitLab. You can access it again via your CAS login. More information is available here.
Quick start
Login to the faculty JupyterHUB using your CAS credentials, click on "Start", wait a few seconds for the session to start and then click on the tool you want to use (e.g. Python, Bash, etc.). Detailed instructions are below.
If lots of
pending in queuemessages and then the messageSpawn failed: timeoutappears after requesting a node, it means that the nodes for theedupartition are full and/or reserved for teaching. You can try usingffa,ffa-shortor your department partition if there are resources available.
Reporting issues
Please use our faculty Mattermost to communicate with the cluster admin about issues related to JupyterHUB. Please send your messages to the channel JupyterHUB and The Virtual Learning Environment. You can also use it to communicate with others working on the cluster. Your feedback and complaints are crucial for keeping the service useful for all of us!
Instructions for use
1. Login
Access to the HUB is provided here. You have to login using university CAS. You start by clicking on the Sign in with Charles University.

Then you will be redirected to university login or if you are already logged in via OAuth from CAS you will be logged in automatically.
2. Selecting the computing resources
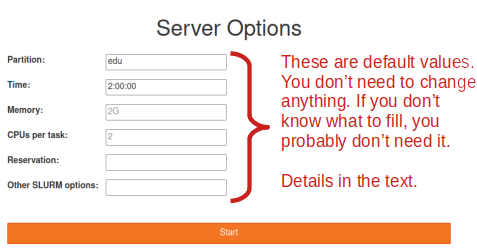
The default resources are a single physical core (equivalent of 2 CPUs in the SLURM scheduling system), 2 GB of RAM and 2 hours of wall time in edu partition. This is meant primarily for education (students) and testing. If you want to do some serious calculation or code development, please use a different partition.
Launching your job may take up to a minute on priority partitions, it may be slower on low priority partition (ffa*). If the resources don't become available in 10 minutes your session will be timed out and you have to try again. The same is true if you request resources that are not available on the cluster.
Resource details:
-
Partition:edupartition should be used for teaching and small short experiments, it is limited but with higher priority. Department / project partitions should be used if you want to do longer / larger session, but you have to be included in the account under which the partition is available. -
Time: maximal walltime for your session, you can use the format hh:mm:ss or d-hh. Please be aware of the time limit of the corresponding partition. Foreduthe time limit is 3 hours. -
Memory: most nodes on the cluster (and all nodes in theedupartition) have 496 GB RAM available, but 2 GB should be enough for many applications. Default units are megabytes. Different units can be specified using the suffix [K|M|G|T]. -
CPUs per task: unless other options are specified, cores on the cluster have 2 CPUs (SLURM counts SMT threads as CPUs), and you cannot access only part of the core. Maximum CPUs for most nodes is 128 (2 processors per node, 32 cores per processor, 2 threads per core) -
Reservation: fill only when you have the reservation code (obtained from your lecturer or admin). These will be typically used to secure resources for the duration of a lecture. -
Other SLURM options: if you are using a partition corresponding to an account it is recommended to add-A account_nameto these parameters. You can also specify other resources (GPUs) or features - for details see gitlab or sbatch manual. Foredupartition you can leave this field empty.
Starting your session will fail in case your requested resources lie outside of the limits of the partition or a machine with such parameters doesn't exist in that partition. The message can read e.g.
Spawn failed: sbatch: error: The limit for edu partition is 3 hours! sbatch: error: Batch job submission failed: Requested time limit is invalid (missing or exceeds some limit)
In this case you requested a session 6 hours long while the time limit for edu jobs is 3 hours.
When you hit the Start button the system will put your job in the queue and you'll see a message
Pending in queue...
Your job will start as soon as the requested resources become available. If the requested resources are currently not available (somebody else has taken them) then you'll see the message Pending in queue... repeatedly until the job starts. If you don't want to wait you can abort the current session and attempt to launch a job with different (smaller) resource request or in a different queue.
3. Starting your first application
Once your session has sucessfully started, you can start using any of the preinstalled tools and applications.
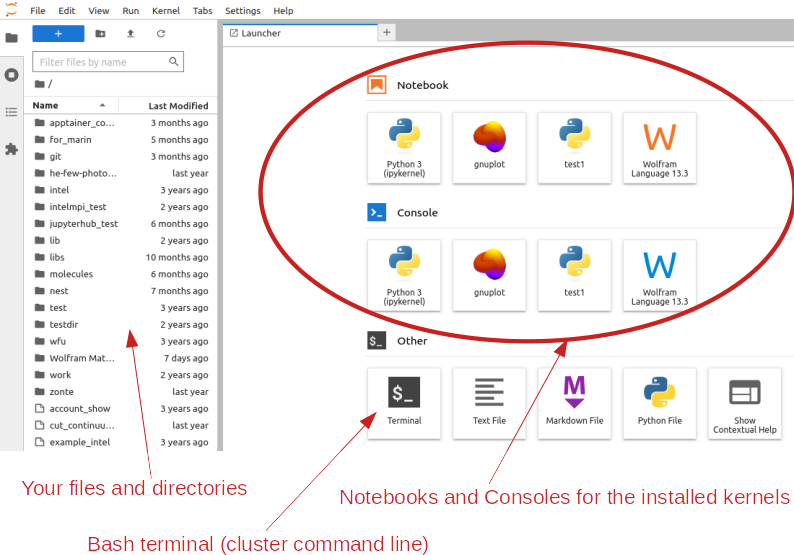
Currently installed kernels (applications) are: Python3, gnuplot, Mathematica. Other kernels can be installed either locally (i.e. by you in your own home directory) or centrally upon request. The full list of supported kernels is available here. There is also the option to open the bash terminal and use it as web based terminal for interacting with the cluster. The application also supports drag and drop of files. Please be aware, that the application does not show hidden files (this option has to be enabled in the configuration).
Many libraries for python can be installed into your user space (home). To install e.g. the networkx library enter pip install networkx into your python cell.
Global installations for Julia are not well supported, there is simple script
install-juliayou can run in bash terminal, that will install julia with default paths and add jupyter kernel to your JupyterHUB.
Uploading files from your computer
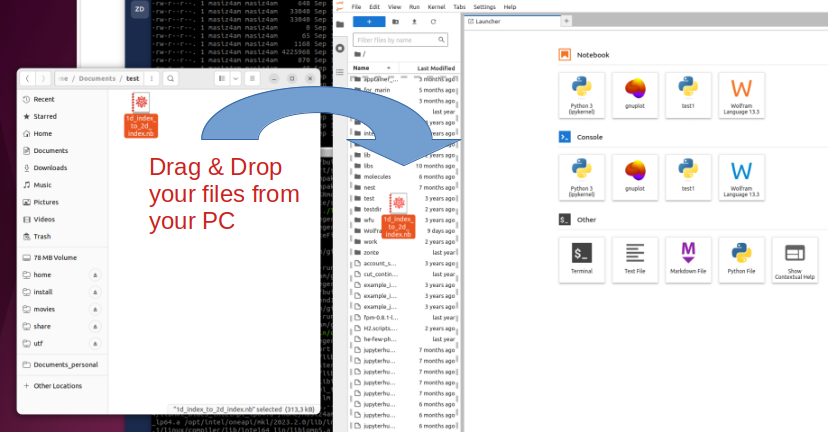
You can copy files easily by drag & drop from a folder on your PC. This avoids the need to use scp and the command line.
Downloading files to your computer
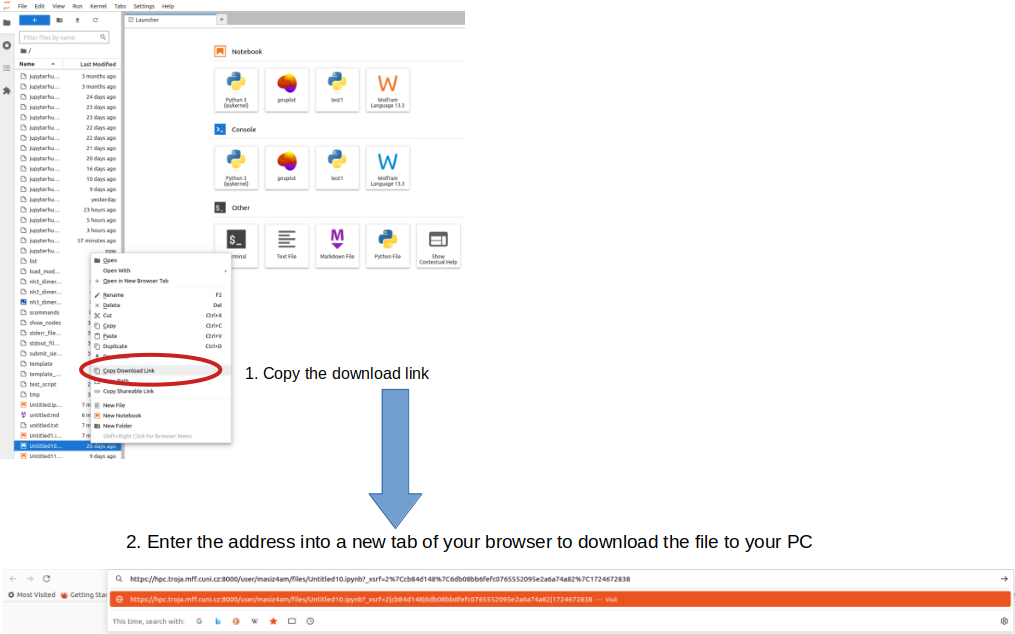
To dowload a file from the cluster to your PC right-click on the file and select "Copy Dowload link" from the menu. Then copy-paste this address into a new tab of your browser. This will dowload the file to your PC.
4. Closing the session
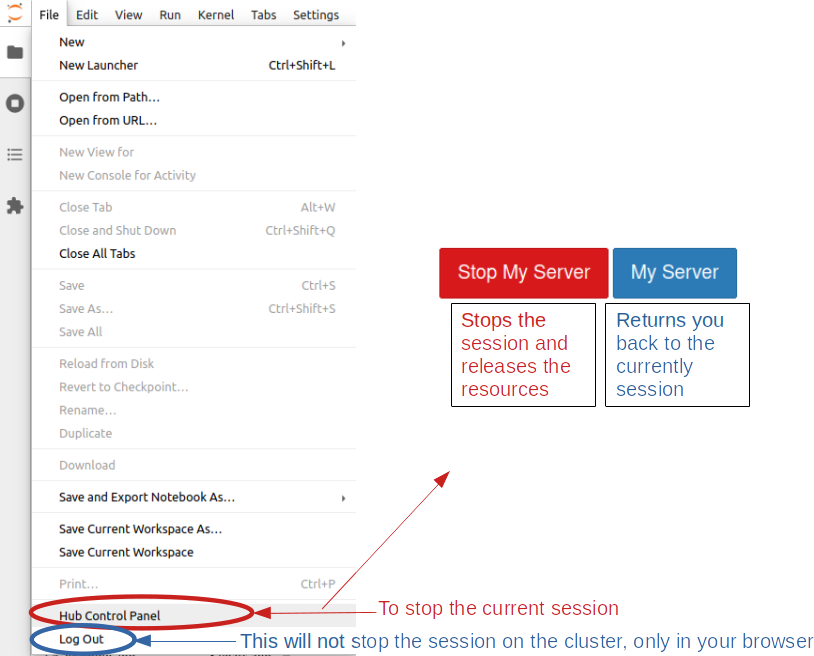
If you want to close your session on the cluster, you need to go to the JupyterHUB control, and end it there.
Log Out will only log you out from the web interface, while your session remains running on the cluster. You can login later and continue working as long as your session remains alive on the cluster.
Your session will be terminated automatically when its walltime exceeds the Time you specified in the resources is exceeded.